Miracle No Knead Bread! this is SO UNBELIEVABLY GOOD and ridiculously easy to make. crusty outside, soft and chewy inside – perfect for dunking in soups!
SCALE
INGREDIENTS
- 3 cups all purpose flour
- 1 1/2 teaspoons salt
- 1/2 teaspoon instant yeast
- 1 1/2 cups room temperature water
INSTRUCTIONS
- DOUGH PREP: In a large mixing bowl, whisk the flour, salt, and yeast together until mixed. Stir in the water until a chunky, thick dough forms. If it needs a little more water, add a few more tablespoons, just enough to get it barely wet throughout. It’s gonna look scrappy and weird and you’re going to question me on whether or not this will work, but it will. Cover the mixing bowl with plastic wrap and let it rest for 12-18 hours at room temperature. Overnight is ideal here, kids.
- PREP FOR BAKING: When you’re ready to bake, preheat the oven to 450. Stick a 6 quart enamel coated cast iron Lodge Dutch Oven (or similar) in the oven for about 30 minutes to heat. At this point, the dough should be big and puffy and pretty loose, with little bubbles in it. Gently scrape the dough out onto a well-floured surface. (Remember: NO KNEAD.) Gently shape it into a ball with flour on the outside, set on a piece of parchment, and cover with plastic while your pan heats up.
- BAKE: Remove the plastic from the dough. Lift the dough and parchment together into the pan so the parchment lines the bottom of the hot pan (be careful not to touch the pan since it’s very hot). Bake, covered, for 30 minutes. Remove the cover and bake another 10-15 minutes to get the exterior nice and golden brown and crispy. Voila! Done. Miracle no-knead bread, you boss you.
NOTES
If you do not have a Dutch Oven: You will just need an oven-safe pot or pan with an oven-safe tight-fitting lid. Please check instructions on whatever you use to ensure it can be heated to 450 degrees (empty for instruction #2).
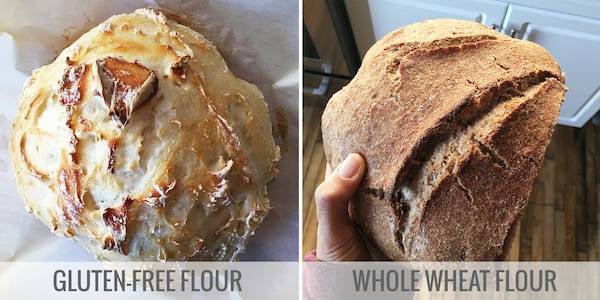
 Based on comments and questions, we decided to try this recipe with both gluten-free flour and whole wheat flour! A few notes for each: 1. Gluten-Free: We tried this flourand the results were great. A hard crust formed on the outside and the inside was soft, airy, and a teeny bit spongy – close to the real thing. Some downsides: the bread didn’t rise as much as the regular version and, of course, it didn’t have quite the same flavor. 2. Whole Wheat: This was very similar to the original version. The texture of the dough was the same, it rose the same, and it looked the same coming out of the oven with its hard crust. The inside texture was denser with not as many air pockets. The flavor was a little bitter and texture was a bit gritty, but to be expected with whole wheat flour.


